Working with the Report Builder
As the name indicates, the Report Builder is a WYSIWIG editor that you use to design the custom reports. Use the Report Builder to create and organize your custom report sections, to edit the header and footer information that will appear on each page of the report, and to save and preview the report. A custom report can contain multiple sections and sub-sections, a table of content, headers and footers. You can configure the sections to generate content from object records.
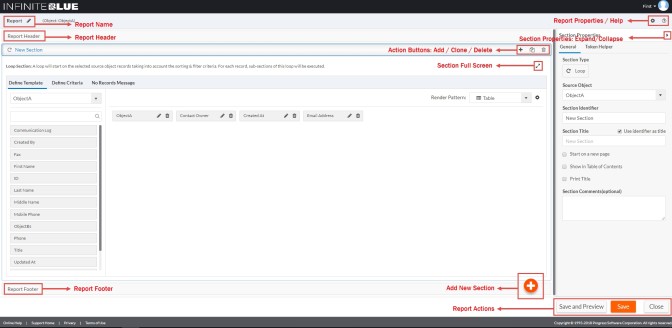
Here's a sample view of the Report Builder.
Interface
The Report Builder editor comprises capabilities that are described in the table below, using which, you can perform specific actions while creating a custom report.
| Report Name |
This is the auto-generated name of the custom report. By default, the report name is a combination of the date/time stamp of the report created. Click the associated edit icon to edit the default name and to reflect a suitable name. You can also edit the report name from the General tab of the Report Properties. When saved by clicking the associated Tick icon , the report name appears on the top of your custom report. |
| Report Properties |
This appears as a gear or settings icon on top of the report builder. Click this icon to view the Report Properties comprising the following tab views:
Click OK to save and exit from the specified report properties. |
| Report Header |
The Report Header appears as a horizontal bar with an accordian-like collapse/expand functionality and contains the Header Properties. This is a mandatory and pre-defined section type with fixed position and cannot be removed. Configure required header information which you would like to see in the report header using the rich HTML editor and the Token Helper from the Header Properties. When the render as PDF option is selected, custom report tokens let you add page numbers, values from records, and other text to headers and footers. Tokens are resolved when the report is generated. For more details on tokens, see Using Tokens in Custom Reports. For example, if you want the report's Header to contain the name of the report, you can insert the Page Title token. If the render as PDF option is not selected, you will be able to view only the Current User and Current Customer tokens.
Note: The report header and footer content is repeated in every page if
you render a report as PDF. When a custom report is rendered as
HTML, the Header information appears at the top of the
report.
|
| Report Footer |
The Report Footer appears as a horizontal bar with an accordian-like collapse/expand functionality and contains the Footer Properties. This is a mandatory and pre-defined section type with fixed position and cannot be removed. Configure required header information which you would like to see in the report footer using the rich HTML editor and the Token Helper from the Footer Properties. When the render as PDF option is selected, custom report tokens let you add page numbers, values from records, and other text to headers and footers. Tokens are resolved when the report is generated. For more details, see Using Tokens in Custom Reports.
Note: The report header and footer content is repeated in every page when
the report is rendered as a PDF output. When a custom report is
rendered as HTML, the Footer information appears at the bottom of
the report.
|
| Add New Section |
This appears as a Plus icon in the Report Builder. Click this icon to add a new report section(s) to your report. Note that each newly added section appears within the Report Header and Report Footer bars. Sections form the crux of the custom reports functionality because the real capability to customize your report design lies within the configuration of sections and sub-sections. There is no limit on adding sections and sub sections to a custom report. For information on how to configure multiple sections of various types to the report, see Section Types and Section Properties. |
Action Buttons
Actions buttons in the Report Builder editor enable you to perform the following actions:
- At the report level: Report level action buttons provide access to Report Properties and Help & Documentation.
- At the report Header/Footer level: The action button
provides access to the report header/footer properties and the rich HTML
editor.
- Access section properties: Click the left arrow button to quickly access the Section Properties if you have hidden it earlier from the view in the right pane of the Report Builder and click the right arrow button (if expanded) to collapse the section properties view.
- At the section/sub-section level: The action
buttons allow you to perform specific actions such as:
- Create a new report section: When you click this icon which is represented as a Plus sign, you will be prompted to choose from Add Section Above, Add Section Below and Add Subsection. Select the required positioning of the section. Selectiong Add Subsection creates a new section as a subsection within the section in context. There is no limit to the number and types of sections that you might want to add within or beyond a section.
- Create a copy of this section: Creates a new section that a copy of the current section.
- Delete this section: Deletes the selected section from the custom report.
- Full Screen and Restore Down options for every section.
- Report Actions: As the name indicates, you can perform these actions on
top of a custom report.
- Save and Preview: Saves the custom report and
generates a Preview in the new
tab of your browser. Note: Ensure that the pop-up blocker of your browser is disabled for the custom report Preview to appear.
- Save: Saves changes to the custom report allowing
you to continue with designing the report further.Note: Alternatively, you can save your changes by using a keyboard shortcut that uses the accesskey attribute on the save button (accesskey="S"). For example, if you use Chrome browser, you must use the keyboard shortcut ALT+S to save. Refer https://developer.mozilla.org/en-US/docs/Web/HTML/Global_attributes/accesskey to know about other browser keyboard shortcuts. In custom reports, this is the only action that has an access key attribute.
- Close: Cancels an action if the custom report is not saves. Exits view from the Report Builder and navigates the view to the object definiton view of your base object.
- Save and Preview: Saves the custom report and
generates a Preview in the new
tab of your browser.
Next Task:Designing a Custom Report