Creating and editing user roles
User roles determine the permissions for the group of users who are assigned to that role. You can create a new role directly or based on multiple existing roles. When a new role is created based on existing roles, it offers the benefit of performing multiple functions, as it inherits pages and a union of permissions of the selected roles and acts as a super-set of those roles.
Perform the below steps to create a role.
-
Navigate to the Setup home page:
- From an application page, do one of the following:
- Select Setup Home from the Platform menu.
- Select Setup Home from the application switcher.
- From an application page, do one of the following:
- In the Administration
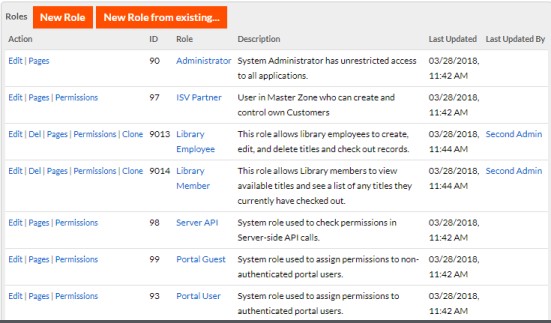
Setup section, click Roles.
The Roles grid appears with the list of currently defined roles:
- To create a New Role,
perform the following steps. Alternatively, to create a role based on the
existing roles, jump to Step 4 of this topic.
- Click New Role from the Roles grid. The New Role creation page appears.
- In the Define User Role section, type the Role Name.
- Type the Integration Code to use this role in formulae and triggers. The Integration Code should be unique across the tenant.
- Type a Description of the new role.
- In the Select Applications section, select application(s) from the Available Applications select box and move those to the Selected Applications.
- Save to view the newly created role in the Roles grid.
- Creating a new role from existing roles.
- In the Roles grid, click New Role from existing....
- In the Define User Role section, type the Role Name, Integration Code and provide a Description of the new role. The Integration Code should be unique across the tenant.
- From the Choose Roles to
Inherit Permissions section, select roles from the
Available Roles and move
those to the Selected Roles
list. A new role is created, which inherits permissions based on the
selected roles. You may choose to fine-tune the permissions once the
role is created.
- Note that you must select a minimum of two existing roles to create a new role. Alternatively, you may select a maximum of ten roles.
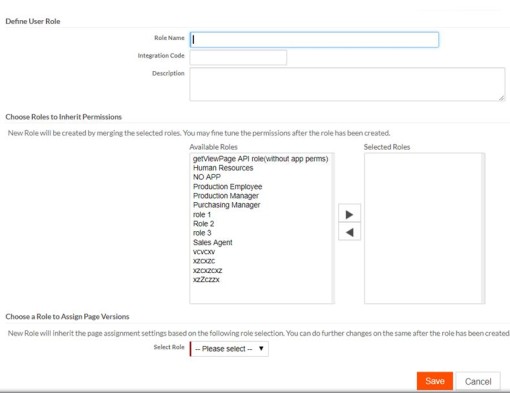
- The list of selected roles will appear in the Select Role drop-down of the Choose a Role to Assign Page Versions section.
- Select Role
from the Choose a Role to Assign Page
Versions section, to map default pages of the selected
role to the newly created role.
The new role inherits page assignment settings based on the selected role. You may choose to configure the pages once the role is created.
- Save. The
newly created role appears in the Roles grid.
NOTE:
- Authentication profile will default to the current system default
- Permissions for the new role will be a union of all the roles selected
- The new role is independent of the existing roles. This means that the user assignment is not inherited and needs to be done separately. The new role does not replace any existing role.
- Role landing page property is not inherited.
- Upon successful creation of a role, click Edit to configure its properties. The available fields for edit are Role Name, Integration Code and Description. The Integration Code should be unique across the tenant.
- Click Clone to copy an existing role and save as it a new role.
- To configure Permissions, see Setting permissions by role for more information.
- To assign a landing page for the role and configure the Pages, see Assigning a landing page to a role for more information.
- To view a role, click the role name.