Section Types
Plain Text & HTML
When you select Plain Text & HTML as the section type, a rich HTML editor where you can enter the content of the section is added. You can also style and format the section using the toolbar available in the editor.
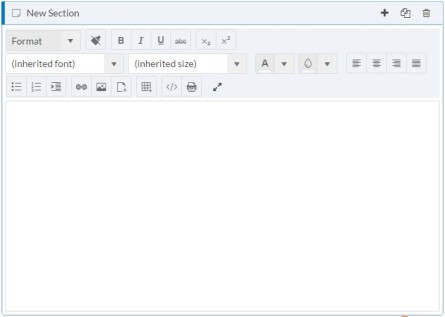
You can use tokens in the section properties; tokens are resolved when the report is generated. For more information about tokens, see Using tokens in custom reports
Tabular
When you select Tabular as the section type, it lets you select fields and configure sorting, grouping, and TotalBy. Also, you can apply filter for the tabular section to control what you see in the final report.

Tabular section will loop through records from the source object and output the selected fields in a table format. You must select at least one field in tabular section to save the report. Tabular section consists of four tabs: Select Fields, Define Criteria, Apply Filter, and No Records Message.
Select Fields
Using the Select Fields tab, you can drag fields from Available list of fields to Selected fields list. Also, you can rename a selected field label by clicking on edit (pencil) icon and reorder the column by dragging it to a desired position. To remove selected field from the list, either click on Delete or drag it back to available list of fields. To search for available fields, you can use the Search field in the top.
Define Criteria
Using the Define Criteria tab, you can Group By, Sort By, and Total By the fields you selected.
- Group By is a drop-down menu which lists fields that you can use for the grouping operation. Next to the drop-down, there is an icon to select the direction of the group by operation. The two supported directions are ascending and descending. The default direction is ascending.
- Sort By is a drop-down menu which lists the selected fields that you can use for the sorting operation. You can select upto three fields. Next to the drop-down, there is an icon to select the direction of the sort by operation. The two supported directions are ascending and descending. The default direction is ascending.
- Total By is a
drop-down menu which lists the selected fields that you can use for the
total by operation. You can select upto three fields.The field next to the
drop-down list is auto-populated with an appropriate total function based on
the field selection made. Note: Grand total cannot include formula fields. The allowed number of Total By fields is controlled by
MaxListTotalsshared property. See Shared Properties for more information.
Apply Filter
The Apply Filter tab enables you to filter records that are rendered as a part of a section. See Applying Filters to a Custom Report for more information.
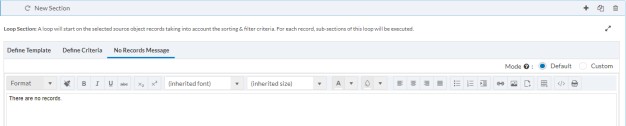
No Records Message
You can add a message to be printed in a table when there are no records available. The default message is, There are no records.
HTML Template
When you select HTML Template as the section type, an HTML Template section that includes two tabs, Define Template and Apply Filter is added.
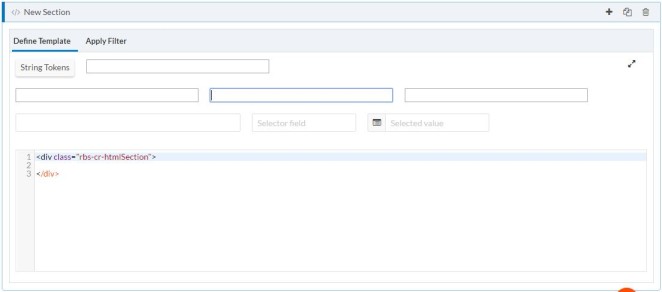
The Define Template tab contains a code editor and a template helper. The Template helper provides tokens and API helper that enables you to define your own HTML template.
The Apply Filter tab enables you to filter records that are rendered as a part of this section. See Filter criteria for more information.
Loop
The enhanced custom report editor offers greater flexibility and control to create all sorts of content using loop sections. In a loop section, you can choose the fields and render the output in different formats for report generation in a loop section. For example, you can drag & drop fields and have Table, Bullet List, Number List & Custom formatted render patterns where a loop starts on the selected source object records taking into account the sorting and filter criteria applied. For each record, sub-sections of this loop will also be executed.
Loop section content can be constructed using templates or by adding sub-sections. You can use Loop tokens, Current User and Current Customer tokens in the template to construct the content. For each loop section, you can control the HTML that will be generated. We recommend you to use tokens that are not of formula fields to avoid undesired behavior in the loops. For more information about tokens, see Using tokens in custom reports.
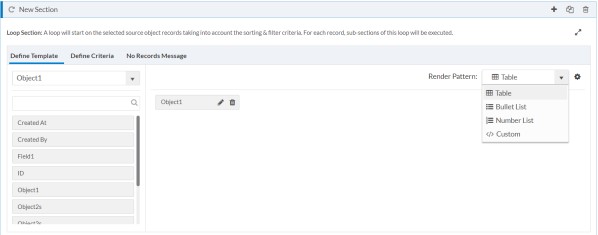
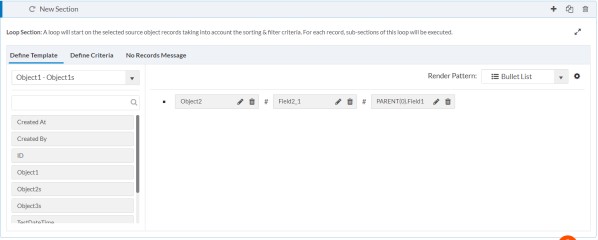
Wizard View in Render Patterns of Loop Section
On adding a new loop section, a wizard view is displayed for the Table, Bullet list or Number list render patterns. The fields can be dragged & dropped from available field container under the Define Template tab.
The parent object fields can also be dragged & dropped by selecting the relationship for the Source Object from the drop-down.
Render Pattern Properties
The Table, Bullet list or Number List render pattern properties can be configured using the settings icon beside the Render Pattern drop-down.
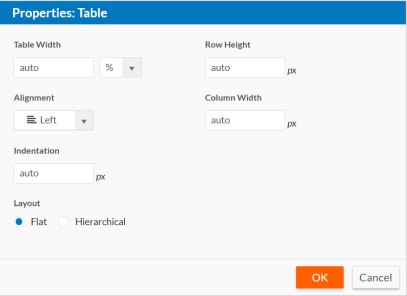
In the Table type of render pattern, the following parameters can be configured:
- Table Width - The table width can be either percentage (%) or pixel (px). By default, the value for the table width is set to 100%.
- Alignment – The table can be aligned to left, center or right. By default, the alignment is set to Left.
- Indentation – The indentation of table from left in pixels (px). It works according to the table width and is enabled only when table alignment is left. By default, the value for indentation is set to auto.
- Row Height – The height of each row of the table in pixels (px). By default, the value for row height is set to auto.
- Column Width – The width of each column of the table in pixels (px). By default, the value is set auto and gets adjusted based on the number of columns in the table.
- Layout – The layout of the table can be set to either Flat or Hierarchical . By default, the layout is set to Flat.
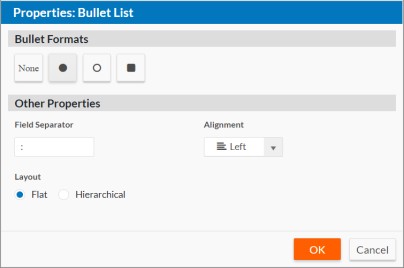
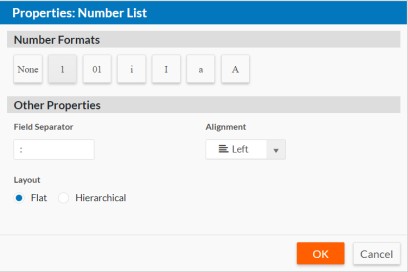
In the Bullet list or Number list type of render pattern, the following parameters can be configured:
- List Formats – The list can be of any mentioned format. For Ex: disc, decimal, circle, number, alphabetical, etc.
- Field Separator – A field separator for each listed item.
- Alignment – The list can be aligned to left, center or right. By default, the alignment is set to Left.
- Layout – The layout of the table can be set to either Flat or Hierarchical . By default, the layout is set to Flat.
The Loop section has the following three tabs.
- Define Template — Defines template
to construct content with the help of token helper. That is, you can view a loop
section as a way to define a container. There are three templates under the
Custom type of render pattern you can define:
- Loop Start — Executed before the iteration of records.
- Loop Content — Executed on each loop record. After the content template is executed for a record, the sub-section of current section will be executed.
- Loop End —
Executed after the iteration of records. Note:
- You can create nested containers in a loop section. See Examples: Loop section for more information.
- When loop templates are used, you must follow proper HTML standards to close all opened HTML tags. If not, you might face an out of memory issue for a report that runs on large number of records.
- The Define Criteria tab enables you to sort and filter out records that are rendered as a part of this section. See Applying Filters to a Custom Report for more information.
- In the No Records Message tab, you
can add message to be printed only in the Table type of render pattern when there are no records
available. The default message is, There are no
records.
Below are the two modes explained for adding No Records Message for Table type of render pattern..
- Default mode – Based on
Rich text editor. By default, this mode is set for adding No Records Message in the Table type of render pattern.
The generated report consists of a table with headers and the
message written in the editor and displays the message inside
the table when no records are available Note: No Records Message occupies the entire table width when no records are available.
- Custom mode – Based on HTML editor. The generated report gets executed from the html script written in the editor and displays the message when no records are available.

- Default mode – Based on
Rich text editor. By default, this mode is set for adding No Records Message in the Table type of render pattern.
The generated report consists of a table with headers and the
message written in the editor and displays the message inside
the table when no records are available
- For other types (except table) of render patterns, the html editor enables you to add the customized message, when there are no records available.
Example: No Record Message Custom Templates
Example 1: Table as template
Content Template
<tr><td> {!#LOOP_REC.name#text} </td>
<td> {!#LOOP_REC.city#value}</td>
<td> {!#LOOP_REC.country#value} </td>
No Records Message Template
<tr><td colspan ="3"> There are no records. </td></tr>
Example 2: Order or Unorder List as Template
Content Template
<li> {!#LOOP_REC.name#text} </li>
<li> {!#LOOP_REC.city#value} </li>
<li>{!#LOOP_REC.country#value}</li>
No Records Message Template
<li> There are no records. </li>Example 3 : Any other template
Content Template
<div> {!#LOOP_REC.name#text} </div>
No Records Message Template - There are no records
Loop Tokens
Current User and Current Template tokens are available for all sections . Whereas, the Loop tokens are available only for Loop sections and sub-sections of a Loop section.
There are some special cases where you want to access the parent Loop token from a sub-section. The following table shows how to access the name field token from parent Loop A.
| Section Type | Sub-section | Content Token | Header Token |
|---|---|---|---|
| Loop A | No | {!#LOOP_REC.name#text} | Loop token not applicable |
| Loop B ( Sub Section under A) | Yes | {!#LOOP_REC.parent(0).name#text} | {!#LOOP_REC.name#text} |
| Loop C ( Sub-Section under B) | Yes | {!#LOOP_REC.parent(1).name#text} | {!#LOOP_REC.parent(0).name#text} |
| Loop D ( Sub-section under C) | Yes | {!#LOOP_REC.parent(2).name#text} | {!#LOOP_REC.parent(1).name#text} |
| Plain HTML ( sub-section under A) | Yes | {!#LOOP_REC.name#text} | NA |
| Plain HTML (Sub-section under B) | Yes | {!#LOOP_REC.parent(0).name#text} | NA |
| Plain HTML (Sub-section under C) | Yes | {!#LOOP_REC.parent(1).name#text} | NA |
Table of Contents
Custom reports do not have a table of contents unless you add a Table of Contents section. You can add this section anywhere in the report.
When you select Table of Contents as the section type, Platform creates a placeholder section that is populated when the report is generated. Table of content lists titles of all sections that has the Show in TOC property selected.
Sub-Report
When you select Sub-Report as the section type, a section in which you can select an existing non-custom report is added. The content of the selected report will be the content of this section. Only reports defined for the Source Object are available.