Creating a portal
Follow these steps to create a portal:
- From the Setup Application page for your
application, select Portals from the
ribbon.
The page scrolls to the Portals section:
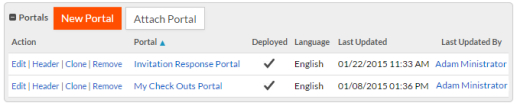
- Click New Portal.
The New Portal page opens:
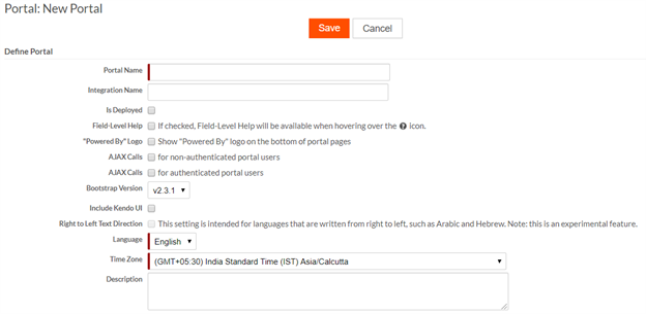
- Enter the following information:
- Portal Name: Give the portal a descriptive name.
- Integration Name: Enter an Integration Name. The Integration Name should be unique across the tenant.
- Is Deployed: Exposes the portal to external access; keep this box unchecked until the portal is ready to use.
- Field-Level Help: If checked, a ? icon displays next to fields and contains any field-level help you have defined.
- "Powered by" Logo: Check this box to include a Powered by Infinite Blue Platform logo at the bottom of portal pages.
- AJAX Calls for non-authenticated portal users: If this box is checked, AJAX calls will be allowed to this portal without authentication. Depending on where and how the portal is deployed, this can be a security risk. Use this option carefully.
- AJAX Calls for authenticated portal users: If this box is checked, AJAX calls will be allowed to this portal with authentication.
- Bootstrap
Version: Select a bootstrap version to be used during
runtime of a portal page. Only users who have an administrator role have
the permission to make a selection. Note:
- By default, when you create a new portal, Bootstrap version v2.3.1 is selected.
- If an existing portal had the Use Bootstrap v3 option checked, the bootstrap version v3.3.7 will be automatically applied to retain the selection.
- If an existing portal had the Use Bootstrap v3 option unchecked, the bootstrap version v2.3.1 will be applied.
- From Platform version 6.3 onwards, the available bootstrap options are v2.3.1, v3.3.7, v4.x, and v5.x.
- When you export or import an application the bootstrap version selected for a portal is retained.
- When you select a bootstrap version (3 or above) and opt to use CDN, the bootstrap files are loaded from CDN.
- Include Kendo UI: If this box is checked, Platform will add Kendo UI-related CSS and JS files for the portal. If you only want to use a few Kendo UI features, leave this box unchecked and include only the files required for those features. This will result in a lighter page that loads faster. For example, currently the entire Kendo UI library is 2,594KB and the two color picker JS files total 33KB. See http://www.telerik.com/kendo-ui for more information.
- Right to Left Text Direction: If this box is checked, Platform will use right-to-left text direction. This is intended for portals that use a language written from right to left, such as Arabic or Hebrew. This is an experimental feature.
- Language: Select the language for the portal pages.
- Date Format: Select the date format to use in this portal in display and input fields.
- Time Zone: Select the time zone for this portal. All date/time field values will be adjusted to this time zone.
- Description: Provide a description for this portal.
- Login URL: Use this setting only for portals embedded into other websites that require authentication. This is the URL for logging into the portal.
- Add to Applications: Select the applications to which this portal will be added.
- Click Save.
Platform creates the portal and a new, empty generic page that is the default main portal page. Depending on your requirements, you can edit this page to add content to it, or you can assign a different main page to the portal and delete this page.
- Create portal pages for the portal.
- If you are planning to use a portal as part of your website--rather than embedding it in one of your website's pages using an HTML iframe--configure the header and footer to adopt the look and feel of your site. See Creating a custom header and footer for more information.
- Configure Portal security.