Working with customer records
To view and work with Customer record details, Platform administrators of the master tenant can do the following:
- From the application switcher, select System
Console:
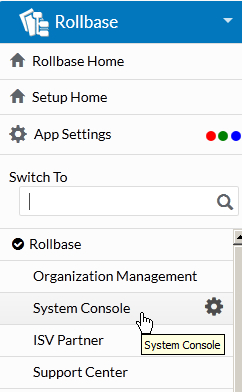
- Select the Customers tab.
- In the Customers List area, click the Customer Name.
- Do any of the following operations:
- View Logs: View log files associated with this customer, which can be useful for troubleshooting and debugging. Requires view permission
- Login: Log into a customer tenant as a Super-Admin (invisible user with full access). This option requires log in permission. The button only appears after the administrative user of the customer tenant enables access for the master tenant users. For more information about enabling support access, see Enabling an administrative user to log into a customer tenant.
- Edit: Modify the customer record. Requires edit permission.
From the More Actions drop-down menu, do any of the following:
- Delete: Deletes the customer record and all customer's data. Requires delete permission.
- Convert: Converts the customer into another object.
- Clone: Clones the selected
customer information to quickly create a new customer. Note: Email and Login Name of the First Administrative User details cannot be same as that of the existing customer.
- Send: To send email notifications using a selected template with attachments to selected users, as required.
- Reindex: To update and reindex
all free text queries for search for the customer. Note: Reindex option is a mass action in the Customer List view area. This action can also be performed from the Customer Record Details page.
- Sync Subscribers: Updates the subscriber information for the customer.
- Login As: Log into a customer tenant as a particular user. This option requires log in permission. The button only appears after the administrative user of the customer tenant enables access for the master tenant users. For more information about enabling support access, see Enabling an administrative user to log into a customer tenant.
- Data Maintenance: Use this procedure to restore the integrity of relationships for this customer. This is only for fixing problems and will not be used under normal conditions.
- System Backup & Restore: Monitor and create system backup files created in this customer. See Backup and restore for more information.Restore from backup: (from Backup page) Use the Restore option to delete all current customer data and replace it with data imported from the selected backup file (no users can be logged in during backup).
- Move Database: Moves customer
data to another (selected) database. Requires edit permission. Additionally, after
performing Move Database, you must navigate to
the customer's details page, under Runtime
Information area, select Load to
load the customer tenant from the production server cache.Note: You unload and load the customer tenant for the new settings to take effect. Only after loading the customer tenant from the production server cache can the users log into the customer tenant.
- Move
Storage: Select this option to move the customer storage from cloud-cloud,
local-cloud, or cloud-local. To perform this operation, select a storage server from the
Storage Server drop-down list and it's
corresponding location from Storage Location
drop-down list. Uncheck Copy Files if you do not
prefer copying files from the storage server/location and click Move.Note:
- Move Storage option is a mass action in the Customer List view area. This action can also be performed from the Customer Record Details page.
- Master tenant can move their own storage and it's corresponding location from the Account Settings page.
- When Copy Files is unchecked while performing Move Storage operation, the corresponding data should be copied manually in accordance to the Platform constraints. The constraints are applicable only when the files are copied from Local to Cloud or Cloud to Local.
- If the log directory in the storage system is configured at the
node level (
node-config.jsonforLogDirkey), then the customer's log directory does not move as part of Move Storage. - On Moving storage from Local to Cloud, logs and backup folders
are moved to a default Platform Storage directory, unless the storage and log
directories are configured in
node-config.json. While the Move Storage operation is in progress, the customer's access to the instance is restricted. The master admin should make sure to notify the customer once the Move Storage operation is executed, the customer can then log in to the instance.
- Move Index: Select this
option to move the search index from one search engine to another. To perform this
operation, select a server from the Search
Server drop-down list, then the new index from the New Index drop-down list and click Move. You can also move the search index within the same
search engine. Search Server and
Search Index are usually independent. The Lucene search index
anyway depends on the selected Search
Server.Note:
- Move Index option is a mass action in the Customer List view area. This action can also be performed from the Customer Record Details page.
- Master tenant can move their own search index from the Account Settings page.
- Set Preferences: Enables
selecting parser preferences for DOC and DOCX documents. Then, select the parser
preferences for DOC and DOCX type of documents.
- Doc Parser: Default, Aspose
Parser and Built-In Parser are
the available options. If you want to make Aspose Parser as the Default option, you must select the
IsAsposeDocParserEnabledshared property. By default, this property is unchecked. See Shared Properties for more information.Note: To use the existing RTF documents, you must ensure that the Aspose Word jar is present in the lib folder. - Docx Parser: Default, Aspose
Parser and Built-In Parser are
the available options. If you want to make Aspose Parser as the Default option, you must select the
IsAsposeDocxParserEnabledshared property. By default, this property is unchecked. See Shared Properties for more information.Note: If Aspose Word jars are not present in the lib folder, the Built-In Parser will be used by default and the Doc Parser and Docx Parser drop-down lists will not be visible.
- Doc Parser: Default, Aspose
Parser and Built-In Parser are
the available options. If you want to make Aspose Parser as the Default option, you must select the
- Update Usage Stats: Checks the overused resources column when either the records or the storage used by the customer(s) exceeds the maximum records or storage allotted. This further restricts file uploads to the system.