Selecting a Custom Report Type
The very first step to creating a custom report involves selecting a custom report type - Record Specific Custom Report or All Records Custom Report. This topic describes the procedure to select a custom report type.
Prerequisite: Ensure that you have created object(s) and an application.
Perform the following steps to select a custom report type:
- Navigate to Setup Home > Applications
Setup > Objects and select an existing object. The object
definition page appears. Note: The selected object becomes the base object on which you will build the custom report.
- Select the Reports tab in the objection definition page. This will bring focus to the Reports grid.
- Click New Report. The
New Report page appears displaying a list
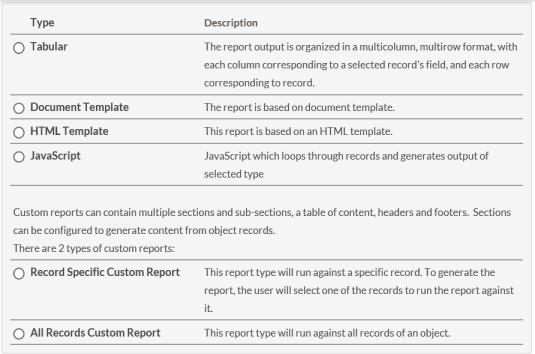
of report types for selection.Note: You can opt to change the base object for your custom report by selecting from the Object Type field.
- Select the required custom report type: Record Specific Custom Report and All
Records Custom Reports.
- Click Next. The Report Builder page appears displaying the following
information:
- The auto-generated name of the report
- Report Header and Report Footer properties. See Working with the Report Builder for more information
- Report Properties. See Working with the Report Builder for more information.
You can clone an existing custom report by clicking the Clone button associated with a custom report in the Reports grid of the selected Object Definition page. the advantage of a cloned custom report involves replicating and retaining similar report sections without the effort of re-creation.
While cloning a custom report, you will be prompted to confirm the cloning action. Upon confirming, the cloned report automatically opens in edit mode for you to work on it.
Next Task: Working with the Report Builder