Pagination Control, Responsive Image Fields, and Custom Reports
Pagination control at top for record list components
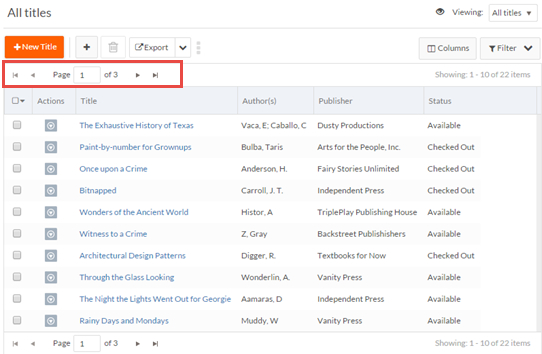
The property Show Pagination at Top, is available in the page editor for record list components. When checked, the component includes a pagination control at the top of the component in addition to the bottom of the component. This property is managed by the administrator. If enabled by the System Administrator, Tenant Administrators cannot disable this property.

The following screen shows a Records List page with this property enabled:
Sizing record list columns as an HTML table
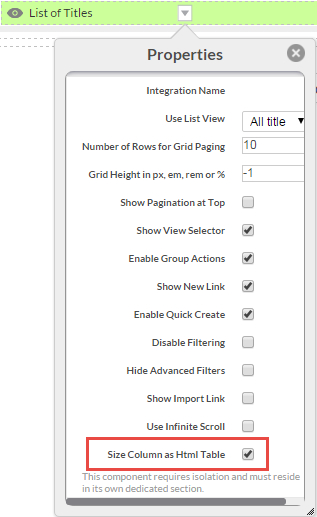
Platform now sizes record list columns as an HTML table by default. This reduces white space in columns and allows more columns to be visible when not all columns fit on the screen. If you do not want this feature enabled, you can turn it off by deselecting the component's property Size Column as Html Table in the page editor:
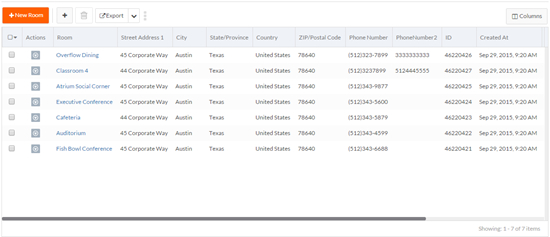
The following screen shows a record list page that where columns are not sized as an HTML table:
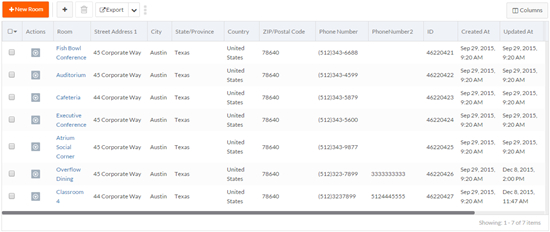
The following screen shows the same page where columns are sized as an HTML table. Note that more columns fit on the screen:
Responsive image fields
You can now specify that all Image Upload and Shared Image fields are responsive to the device size. The following screens show a responsive image field on different screen widths.
If you want image fields to be responsive, set the property rb.newui.options.useResponsiveImage to true in a custom sidebar script that executes before
the UI starts. If responsive images are enabled, Platform ignores the width and
height properties set for images in the page editor. See useResponsiveImage for more information.
Role-based landing pages
You can now configure a landing page for a role. The configured landing page includes the application page and the tab to open. When a user with that role logs into Platform, the configured page opens with the configured tab selected.
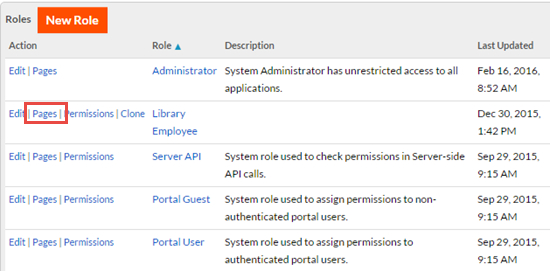
To configure a landing page for a role:
- Navigate to the Setup Home page.
- Select Roles.
- Select Pages next to the role for which you want to
configure the landing page. The Assign Page Versions page opens.
- Select the Configure landing page for the role check box.
- From the Select Application drop-down list, select an application.
- From the Select Tab drop-down list, select a tab.
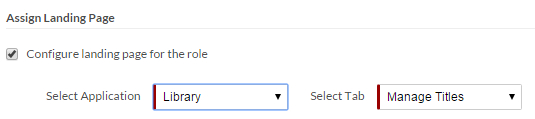
- Click Save. When a user with that role logs in, the configured application will open with the configured tab selected.
Ability to change uploaded file without changing its URL
Prior to this release, if you changed a File Upload field by uploading a different file, a new URL would be generated for the uploaded file. This could result in outdated links for applications using that URL. In this release, the URL for the newly uploaded file does not change.
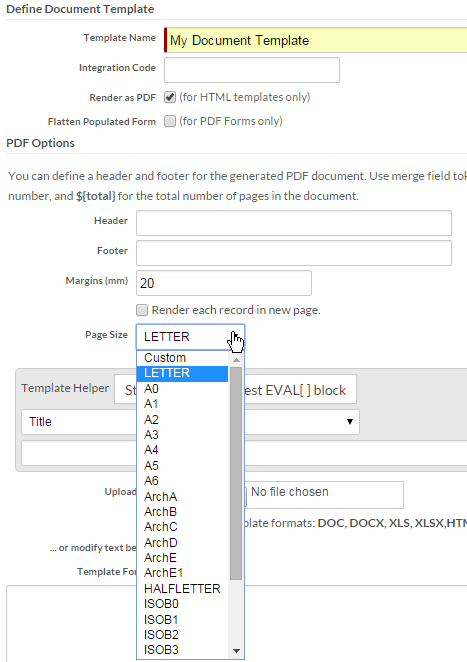
Additional page sizes for PDFs
For document templates, HTML template reports, and document template reports, Platform now supports all PD4ML-supported sizes for Page Size as well as custom sizing. In all cases, you must select Render as PDF to enable the Page Size option.
The following screen shows the Page Size options for a document template:
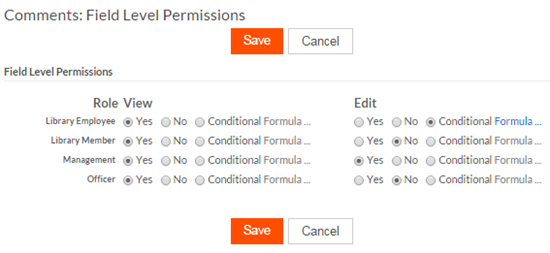
Conditional field-level permissions
You can now specify conditional formulas for field-level view and edit
permissions. Each formula must return true or
false. If the formula returns true, that permission is granted for the specified
role. If the formula returns false, that
permission is not granted for the specified role.
For View or Edit permission, you can specify Yes, No, or Conditional Formula by selecting a radio button for each role as shown below:
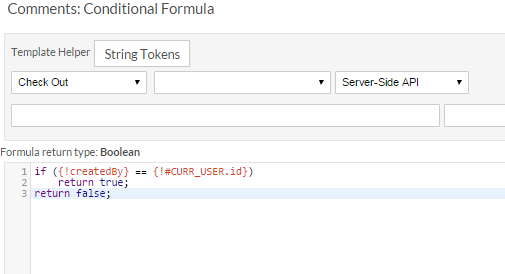
The following screen shows a condition formula. In this example, the createdBy field (whose value is a user link), must equal the current user to grant edit permission on the Comments field.
Note the following when implementing conditional edit permission:
- For performance reasons, keep conditional formulas short.
- To grant edit permission on a field, you must also grant view permission on that field. This applies to both non-conditional and conditional permissions.
- Edit permission is granted for any use that creates or updates records, including Edit pages, Mass Update pages, and inline editing.
- For mass updates, Platform updates only those records for which the
condition formula returns
true. - When updating records using SOAP, REST, and Server APIs, Platform does not use conditional permissions.
The REST method getPermissionsByRole now outputs conditional
for fields with conditional permissions. See getPermissionsByRole for details.
The REST method setPermissionsByRole now includes the following parameters
for conditional permissions:
viewConditionScript— The condition script forviewpermission as a base64-encoded string. To grant conditionalviewpermission, specifyviewin thepermissionsparameter in addition to this parameter.editConditionScript— The condition script foreditpermission as a base64-encoded string. To grant conditionaleditpermission, specifyeditin thepermissionsparameter in addition to this parameter.
For more information about field-level permissions, see Setting field-level permissions
New administrative permissions for non-administrative roles
This release introduces new administrative permissions for non-administrative roles. This allows you to appoint users with a particular role to be able to manage roles and users, and to enable and disable support access from the master tenant, without granting them full administrative permissions.
The following permissions are now available:
- Manage Roles — Users with this permission can create and edit roles. They can only create roles with the same set of permissions as their own role or with a subset of those permissions. They cannot manage the Administrator role or their own role. They cannot assign any administrative permissions to any role.
- Manage Users — Users with this permission can edit users if they have the appropriate permissions on the User object. They cannot assign the Administrator role to a user.
- Configure Support Access — Users with this permission can enable and disable support access from the master tenant.
New post install script for applications
You can now create a post install script that will be executed after an application is installed during customer creation. For example, if you want the new customer's first user to have a custom role instead of the default Administrator role, you can write a post install script for the Platform application that changes the first user's role to a custom role (see Pagination Control, Responsive Image Fields, and Custom Reports). If multiple applications are installed during customer creation, Platform executes each application's post install script in the order in which the applications are installed.
To create a post install script for an application:
- Navigate to the setup page for an application to be installed during customer creation.
- Click Post Install Script.
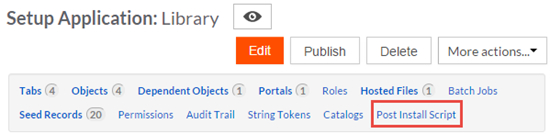
- Click Edit Post Install Script.
- Edit the script as desired.Note:
If the post install script's purpose is to create a tenant with no administrator, you can access the automatically created user with the Administrator role and change the role to a custom role with some administrative permissions. For example:
var objId = rbv_api.selectNumber ("SELECT id FROM USER where role =90"); // Administrator role's original ID is always 90 var role = rbv_api.stringToJson(rbv_api.getRoleById("868114")); // Custom role with admin permissions rbv_api.setFieldValue("USER",objId,"role",role.code); // Set user's role to custom role - Click Save.
New shared property AllowAdminLessTenant
The new shared property AllowAdminLessTenant, when set to true, enables tenants without administrative users.
Does not apply to the master tenant. Defaults to false.
See Pagination Control, Responsive Image Fields, and Custom Reports for information about administrative permissions for non-administrative roles.
See Pagination Control, Responsive Image Fields, and Custom Reports for information about creating a tenant without administrative users.
Custom reports (beta)
This release includes a beta version of custom reports. A custom report can include multiple sections and sub-sections with no limit on the number of sections or the depth of sub-sections. You can use custom reports to build rich, highly customized documents to present your application's data.
Features of custom reports include:
- A Report Builder where you design and organize report sections and sub-sections
- Special tokens you can use to easily access records used in the report
- The ability to preview a report directly from the Report Builder
- A Table of Contents section that you can place anywhere in a report
- A section that loops through a list of records. You can control the order of execution and filter the set of records on which to execute the loop.
- A Sub-Report section that inserts an existing report into the custom report.
For more information about custom reports, see Selecting a Custom Report Type.